In today’s digital age, having a website is crucial for any small business. It not only helps establish an online presence but also acts as a platform to showcase your products and services. To establish this online presence, many small owners will reach out to agencies to help them on the journey. Some of the DIY types, will go and create the website themselves. Whichever route you go, the good chance is that by default you will end up creating a Dynamic website on one of the website building platforms, such as WordPress, SquareSpace, Wix, Duda, Webflow, etc.
Some small business owners may be put off by the perceived cost of website development and maintenance, will forgo the complete process, and instead focus on “word-of-mouth” marketing activities.
The good news is that there are alternatives in the form of a static website. Creating a static website doesn’t have to cost a dime. In this article, I’ll explain how to create a static website for free and have a custom domain linked to it. As icing on the cake, I will show you how to host your static website for free.
Who is this guide for?
The initial question that must be addressed to guide readers is: Who is the intended audience for this article? What user persona did I have in mind when conceptualizing this article? While the article could be read by a wide audience (and yes, we encourage everyone to read it), I primarly thought about SMB owners who:
- until recently had their website created using Google’s now-discontinued free Business Profiles service and who now need to restablish their online presence.
- realtors who often need landing pages for properties they are selling with the domain name linked to the property’s physical address.
- anyone who’s needs to build a website on tight budget, or with no budget at all
To make the things simpler and eaiser to follow, I will be focusing on the “Realtor” user person and will show how to create a static website for free that consists of a single page and is tailored to realtor’s needs.
What are minimum prerequisites needed to create a static website for free?
If you have used any sort of a website builder in the past, such as Wix or SqureSpace, you will be able to follow this guid, create a static website and host it for free.
If, on the other hand you’ve never created a website, don’t sweat. I’ll make it simple for you. But I do recommend that you watch a few YouTube videos on WordPress and Gutenberg editor, as that is tech stack we wil be using in this article (among other technologies).
What is a static website?
First things first, let’s define what a static website is. A static website consists of a single or multiple but minimal number of web pages that are pre-built and served to the user exactly as they were created. Their content remains the same whenever users access it, and could remain the same forever. In other words, static websites do not change unless edited manually and reuploaded to your host.
What are some of the use cases for static websites?
Despite the limited functionality, static websites can still be excellent for specific use cases. The most common are:
Marketing Landing Pages
If you are a real estate agent, you may want to set up a static website for the property you are selling.
- For example, if you are selling a house at 1 Madison Avenue in Miami, and need a website to showcase the property, you are likely to set up a static landing page with the URL: https://1madisonavemia.com
- The goal of this landing page will be, not only to showcase the property, but also provide your contact information to potential buyers
- Once the property is sold, the static page can continue lingering online, adding to your real estate transactions portfolio.
Event Posters
If you are organizing an event and need a website that will show the information about the event, along with the event’s agenda, you may want to set up a static website for that.
- For example, if you are running an annual conference for your industry and peers, you are likely to set up an informational static website with the URL: https://2024annualconference.com
- This static website may contain information on: how to get to the conference, where to stay, conference agenda, resource page, etc.
- For next year’s conference, you are likely to set up another static website with the URL https://2025annualconference.com, and so on.
Static Websites Examples
Here are the examples of five static websites created using the approach we are about to follow and hosted on Netlify for free:
- Barber shop landing page
- Dog walker landing page
- Pet groomer landing page
- Cleaning services multi-page website
- Painting service multi-page website
What are the Pros and Cons of static websites:
Static websites, as any other technology solution, have their advantages and disadvantages ranging from faster time-to-value to enhanced security to potential limitations in scalability, Some of the pros and cons are listed below:
PROS
CONS
How to create a static website for free using WordPress?
Now, let’s review the steps involved in making a static website and hosting it for free. The process is as follows:
- Domain name registration
- Domain name redirection to your hosting provider
- Website builder selection
- Theme selection
- Temporary enviroment setup
- Theme set up and pages customization
- Export to a static version
- Hosting platform setup
- Upload the website to the hosting provider
- Register your domain with the hosting provider and secure it
- Website backup operation
Despite the number of steps involved, the work is quite simple. At the high level, we will build the website in one place, and host it in another place. We will use a few services and software tools to help us acomplish this task. Time wise, I suggest you set aside about 2 hours to complete this work, though you may be able to speed through it faster. (Some of you may need more time…)
Let’s dive in.
Tools and services we will be using in this exercise to create a static website for free and host it for free:
Step 1: Register the domain name
Most website builders offer a free subdomain on their own domain. Webflow for example will let you publish your webiste on their subdomain and you will end up with a URL with this pattern: https://myname.webflow.com
I recommended to purchase a custom domain name that reflects your business. You can purchase a name through a number of domain registars our there, though I recommend you go with Ionos. (Bluehost is another solid company that offers Domain registration, but not at the same affordable price point as Ionos.) Ionos offers a good service at affordable price point and will charge you $1 for the first year. This could be especially appealing deal if you are building a landing page for your campaign (i.e. the real estate property you are selling) and do not need the domain name upon the campaing completion.
Go for a name that’s easy to remember and related to your business or the campaing you are running.
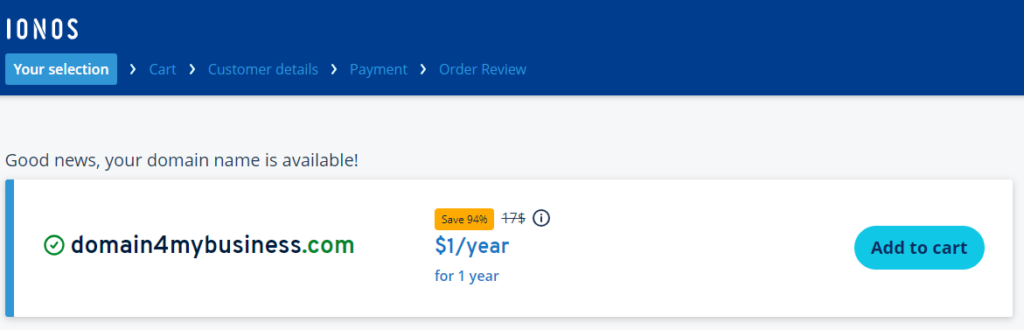
Once you purchase the domain, you will be greated with IONOS’ Domain & SSL pannel where you could modify the domain details and change its Destination, or rather point it to a place where your website will be hosted. As in this article I suggest you host your website for free on Netlify (will come to this further down the page), you would need to navigate to the Name Servers area to input Netlify’s name servers.
Point your domain’s name servers to Netlify
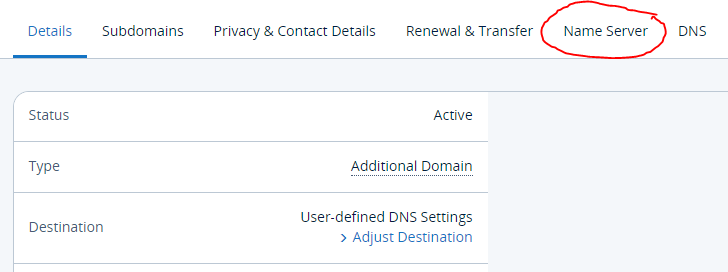
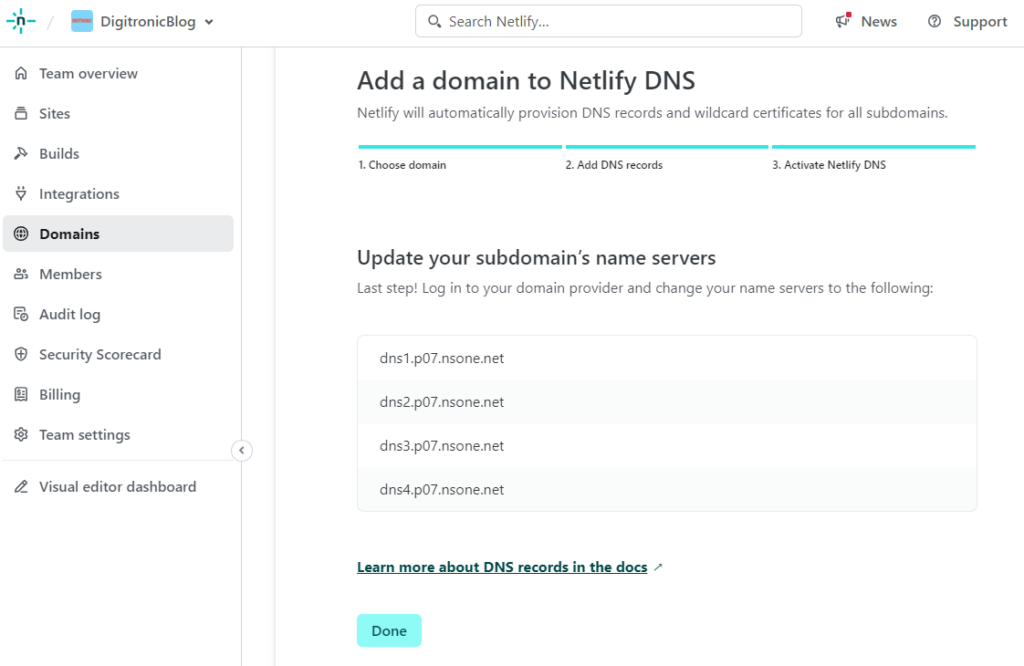
Click on the Name Servers to be taken to the screen where you will need to input the names of four Name Serves provided by Netlify. They are:
- dns1.p07.nsone.net
- dns2.p07.nsone.net
- dns3.p07.nsone.net
- dns4.p07.nsone.net
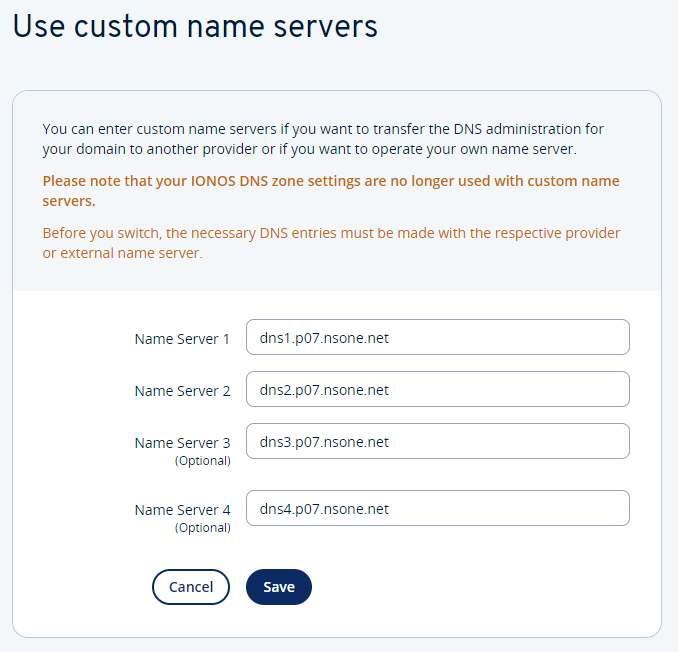
Once you input the name serves, click the Save button, and this is were we stop for now. This operation will ensure that the domain name you just registered on Ionos points to the place where your website will be hosted (on Netlify). Additional steps in this process – registering your domain name in Netlify and mapping it to your website – will have to be completed later on Netlify’s website.
Step 2: Choose a website builder
There are many website builders out there, and the list is growing by a day. No-code platforms such as Webflow, SquareSpace, Duda or WordPress are popular and easy to use. These website builders offer pre-built templates that you can easily customize to fit your small business needs. For our use case, we will be going with WordPress, the most popular website builder that currently powers about 44% of internet websites.
What’s the step that you need to do right now, you may be asking? There is none. Keep on reading.
What is WordPress?
A WordPress is the world’s most popular website builder that powers approximatelly 44% of the internent, if not more. It is open source, which means you can use it for free, it is user-friendly and customizable. Core WordPress platform can be enhanced with plugins to add more functionaly to it such as contact forms, online shop (ecommerce capability), online directory, and search engine optimization (SEO) tools, and so on.
Most of the SMB owners today use WordPress for their websites. Percentage wise, we would argue that number is in high eighties.
Step 3: Choose a WordPress theme
Now that you’ve selected the WordPress for your website platform, you will need to select the WordPress theme to build the website on. Though there are thousands of themes available, we suggest that you pick the one of the Gutenberg compatible big name themes that offer good starter templates. Good FREE themes to go with are GeneratePress, Kadence, Blocksy, Astra and Neve. As we will be using the Free version for the theme for our exercise, we will go with Kadence, due to clean code it outputs, and the quality of its starter templates.
What is a WordPress Theme?
A WordPress theme is a collection of files and images that work together to create the visual design and layout of your WordPress based website. The defines how the site will look to visitors, including aspects like colors, fonts, page structure, etc. In one sentence, the theme drives the look and feel of your website.
Modern themes allow you to easily change the appearance of your websites with simple drag and drop actions or the changes applied through what is called a “customizer”. They provide a quick and convenient way to customize the design of yoru website to match your brand and your visual preferences.
Popular and high quality themes available today include Kadence, GeneratePress, Blocksy, Neve and Astra.
Step 4: Install WordPress and customize your website
Oh Lord, this even the title of this section and everything about it sounds complicated, but it is not.
First, we need the enviornment to work in. For that, we will be using the service offered by InstaWP.
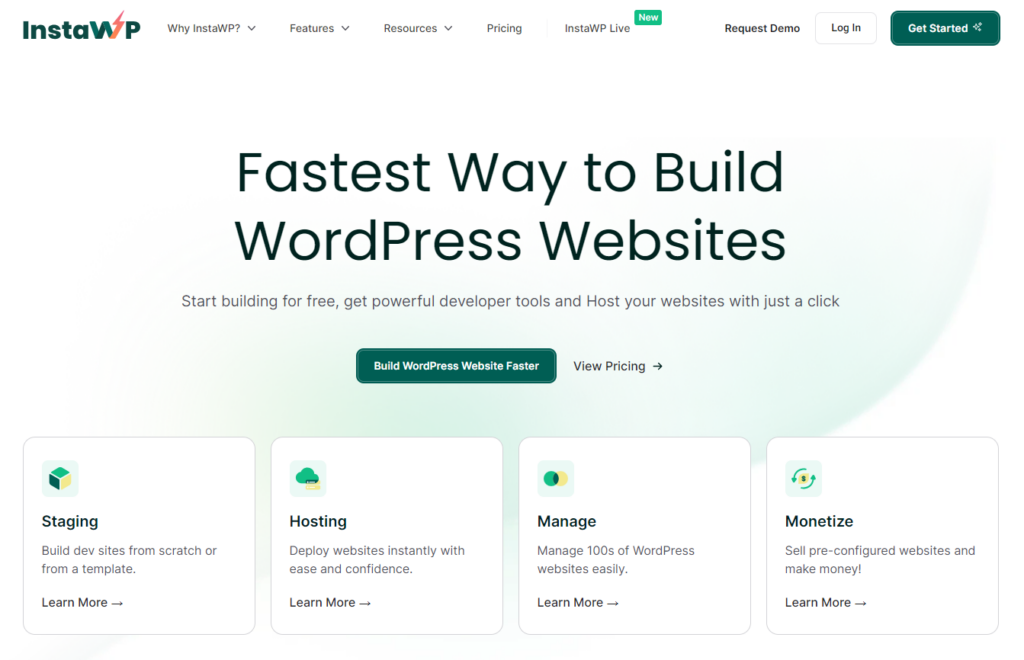
InstaWP is a cloud based offering that lets you set up the WordPress enviornment with a click of a button. We will be using the InstaWP’s temporary service, which lets you create what is called a Staging Website for free. These websites are temporary and expire after 7 days. Hence, you have plenty of time to polish the things up.
- Navigate to https://instawp.com/ to get started and register your free account.
- Once you register the account, you will be greated with InstaWP dashboard.
- From here, click on the green “Create Your First Staging Site” button..
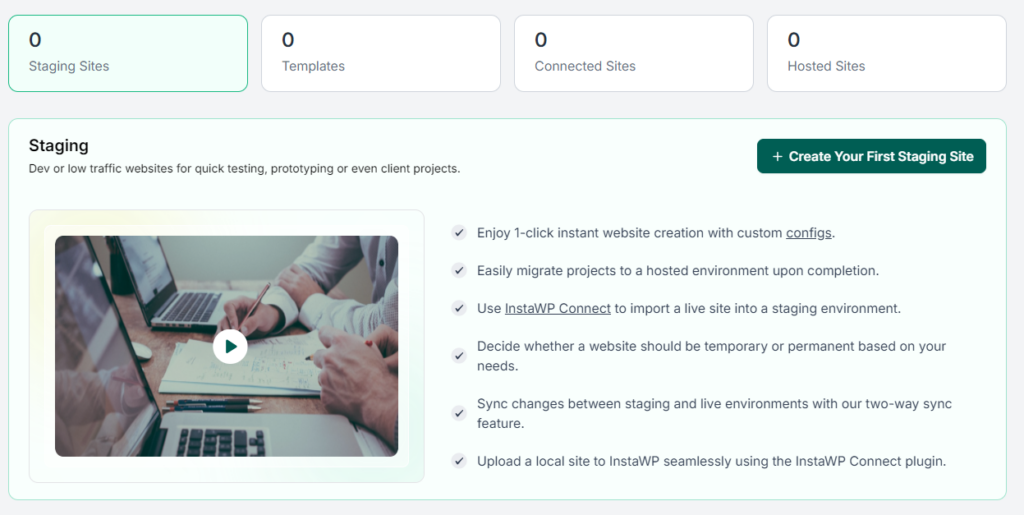
- Uncheck all preselected options and click “Create Site”.
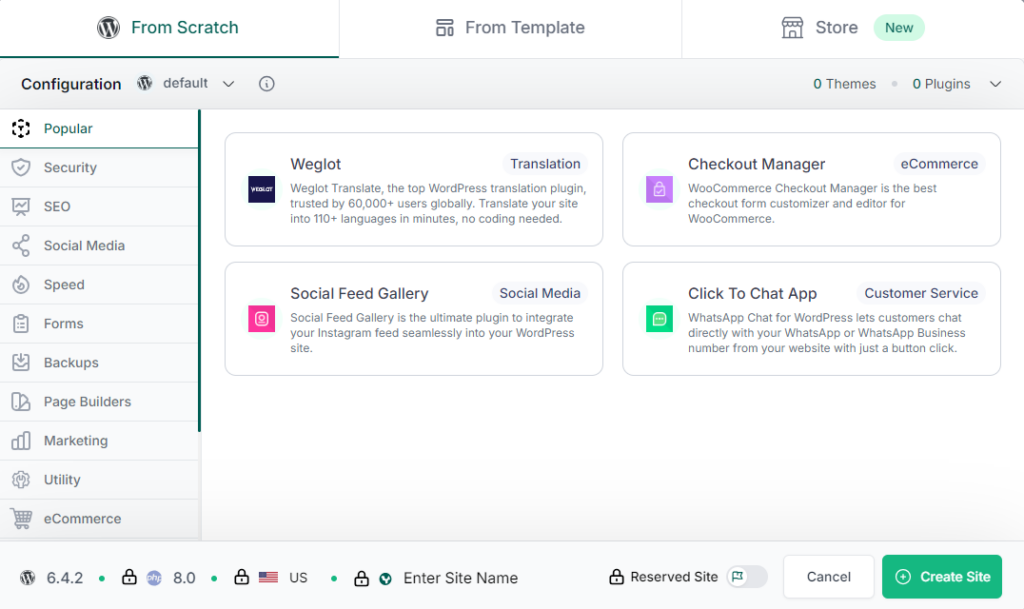
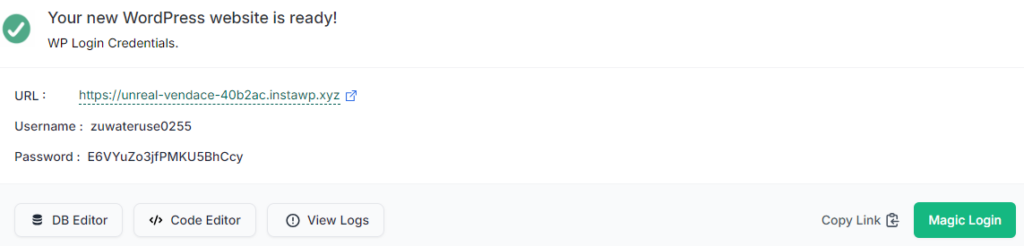
- InstaWP will run it’s magic, and you’ll get a ready-to-go website in about 2-3 minutes. (This service is just awesome!)
- Click on the “Magic Link” button to log in to your temporary staging website that we will use to build your static website.
You are now greeted with the WordPress dashboard. Before we dive customization, here is what we will acomplish:
- Change the Site Title
- Change the Site Tagline
- Uncheck “Discourage search engines from indexing this site”
- Install a WordPress theme Kadence
- Install Kadence Starter Templates
- Import the template we will work from
- Edit the Home Page
- Customize the Header (add your business logo and remove the Menu)
- Customize the Footer (update your contact information and social links)
- Convert the Home Page to a static version and export it
- Publish your website
We will be using the Menu on the left hand side to navigate the different through the WordPress.
Let’s dive in:
Change the Site Title & Tagline
Using the Menu on the lef, navigate Setting > General and make changes in the “Site Title” and the “Tagline” areas.
- Site Title is normally the name of your business
- Tagline could be a shortened version of your mission statement.
If we take a look at Airbnb website, we will seee the “Airbnb” is noted as a Site Title and “Vacation rentals, cabins, beach houses, & more” is noted as a Tagline.
While you are in this “Settings” section, head over to the “Reading” area and Uncheck “Discourage search engines from indexing this site”. This may not be impacting your static site, but it is a good practice to uncheck this option.
Install the WordPress theme “Kadence” & import starter template
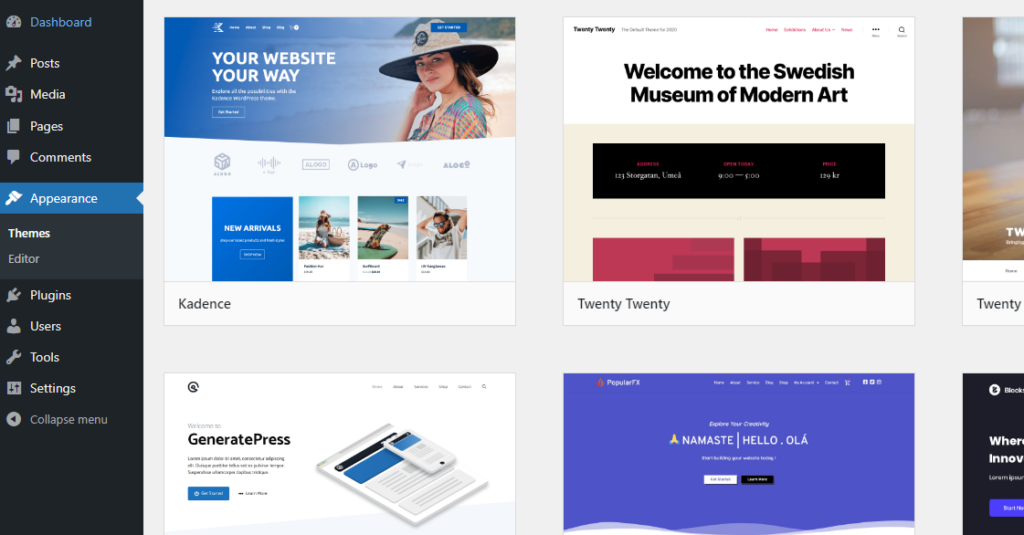
Head to the Appearance > Themes section. This is where you go to change the WordPress theme, and thus change the look and feel of your website.
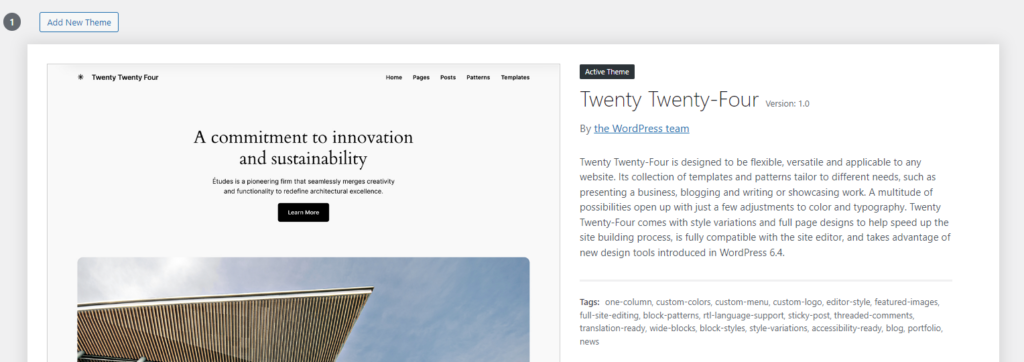
- Click on the “Add New Theme” button
- Scroll a bit down to find the Kadence theme
- Hover over it to enable the “Install” button > click “Install” followed up by clicking on “Activate”
- This will make the theme active on your website.
The Kadence Theme offers both FREE and PRO versions. For the purpose of creating the free static website, the FREE version is more than suitable. However, as down the road, the needs of your business may outgrow the static website capabilities, upgrading it to the dynamic one built on top of the Kadence Theme PRO version would be the way to go. As such, it is important to understand the distinctions between the two, which are outlined below:
KADENCE THEME FREE
KADENCE THEME PRO
With Kadence Theme activated on your website, you will be taken back to the Themes screen and offered the option to Install AI Starter Templates → Go ahead and do that.
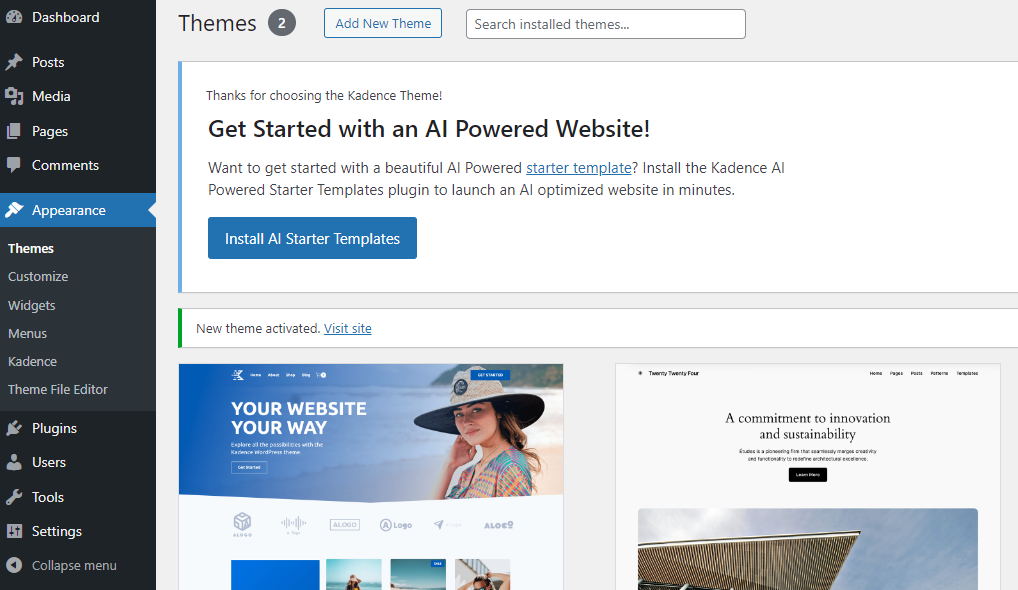
- The next screen will offer you the option to “Generate a Starter Template with AI.”
- Politely decline the offer and instead select “use Classic Starter Templates” option

This is where the fun starts!
While it is hip these days to use GenerativeAI for everything possible under the sun, and while Kadence AI solution is a fairly good one, I feel for our purpose it will be easier to go with the pre-made classic templates. You can always go back and use a bit of GenAI help, if you get stuck or need inspiration, and I encourage you to explore that option on your own time. After all, this is direction that the world is taking, and the sooner you hop on the train, the better.
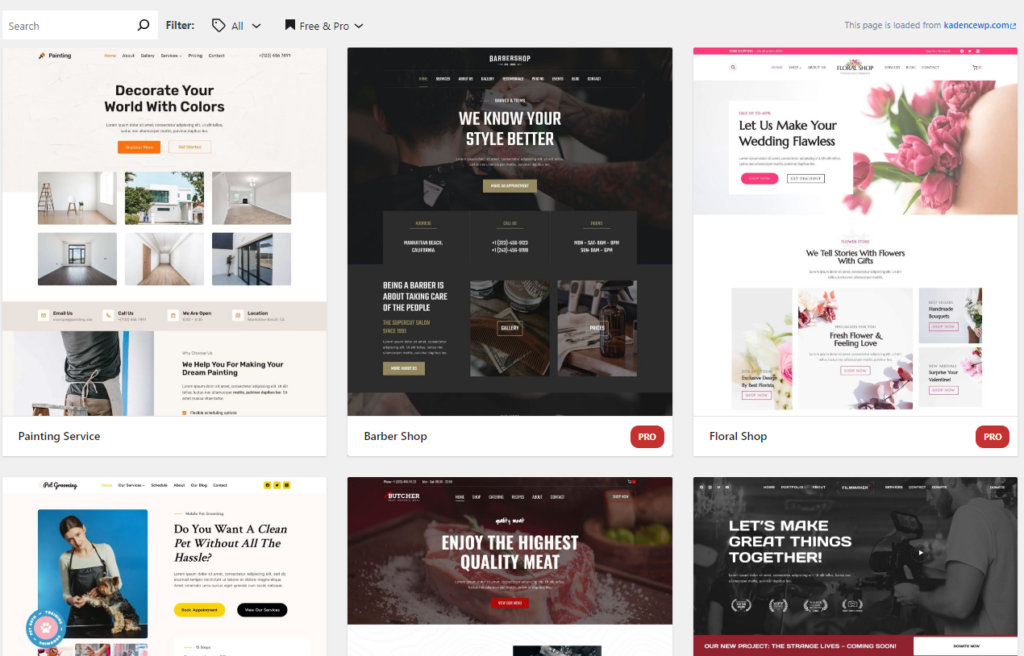
Install the Kadence theme, choose a template that fits your business and customize it to suit your needs.
The Kadence Classic Templates offer top-notch quality and have a distinct modern aesthetic that resonates well with website visitors. Browse through the available Free template and choose the one that best suits your style and needs. For the purpose of this walkthrough, we will be going with the “Real Estate” template.
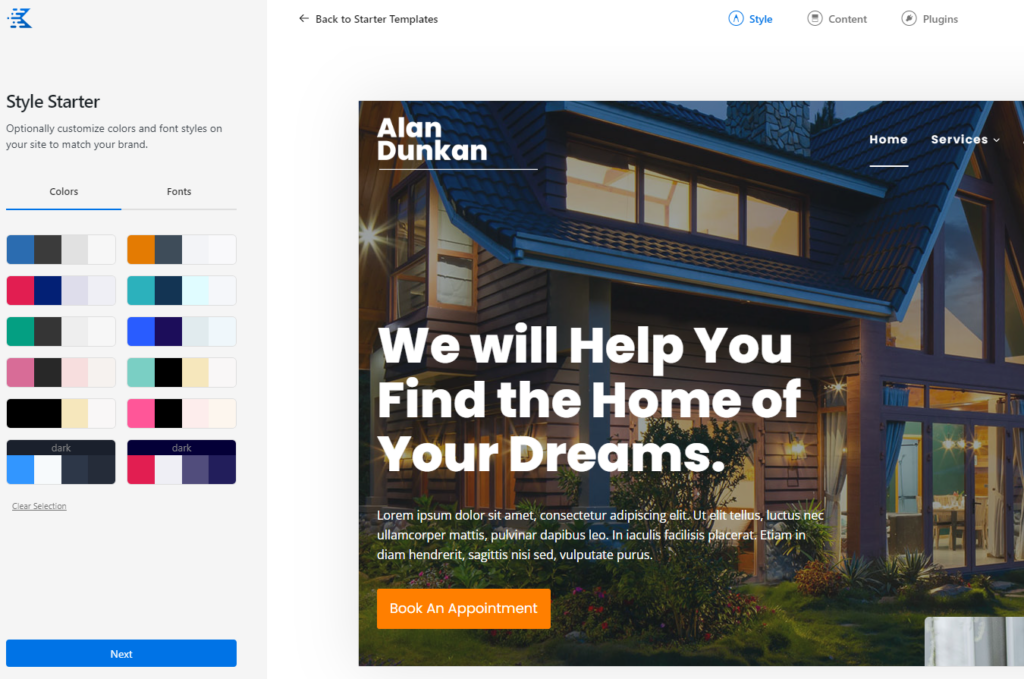
- Once you select the template and click on it, you will be presented with the importer screen
- On the first screen you’ll have the option to change the Colors and Fonts of your website. Here you can pick one of the pre-configured color palettes. If none of the available palette’s speaks to you, go with the defaults, and you’ll have the option to set the custom paletted that resembles your brand later on via the Customizer screen.
- On the next screen you have the option to “Import Full Site” or “Only Selected Pages”.
- Even though we are building a 1-page static site, we will still go with the “Full Site” import, as that will ensure that the “Customizer Settings” are imported. Customizer Setting control the look and feel of our website, and we want to retain the original look and feel of the starter template we are importing.
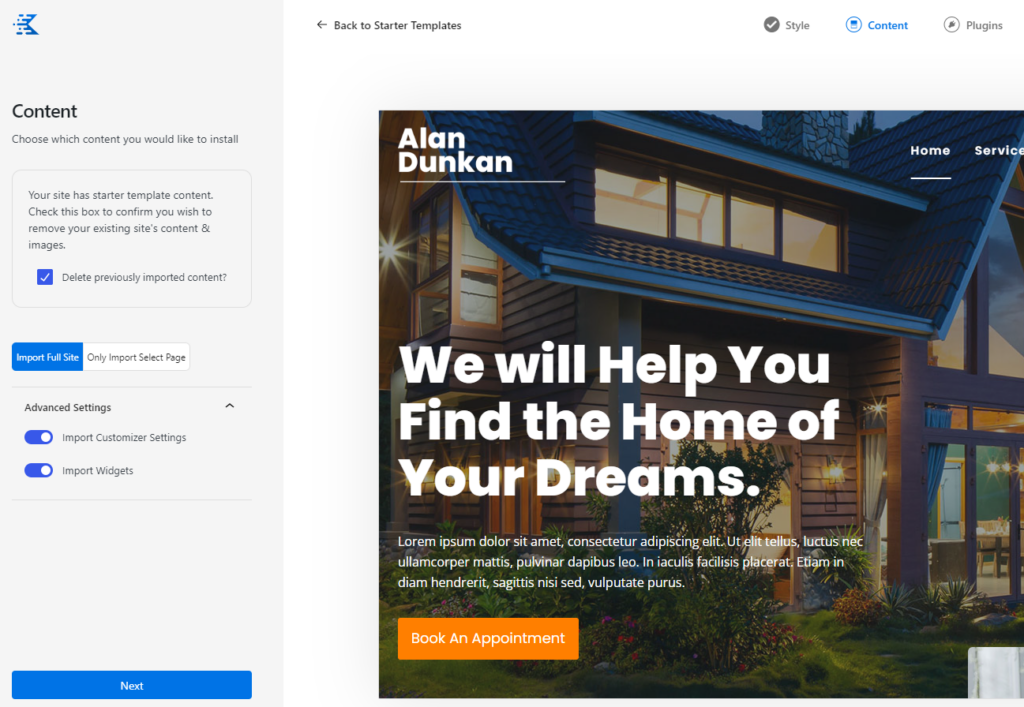
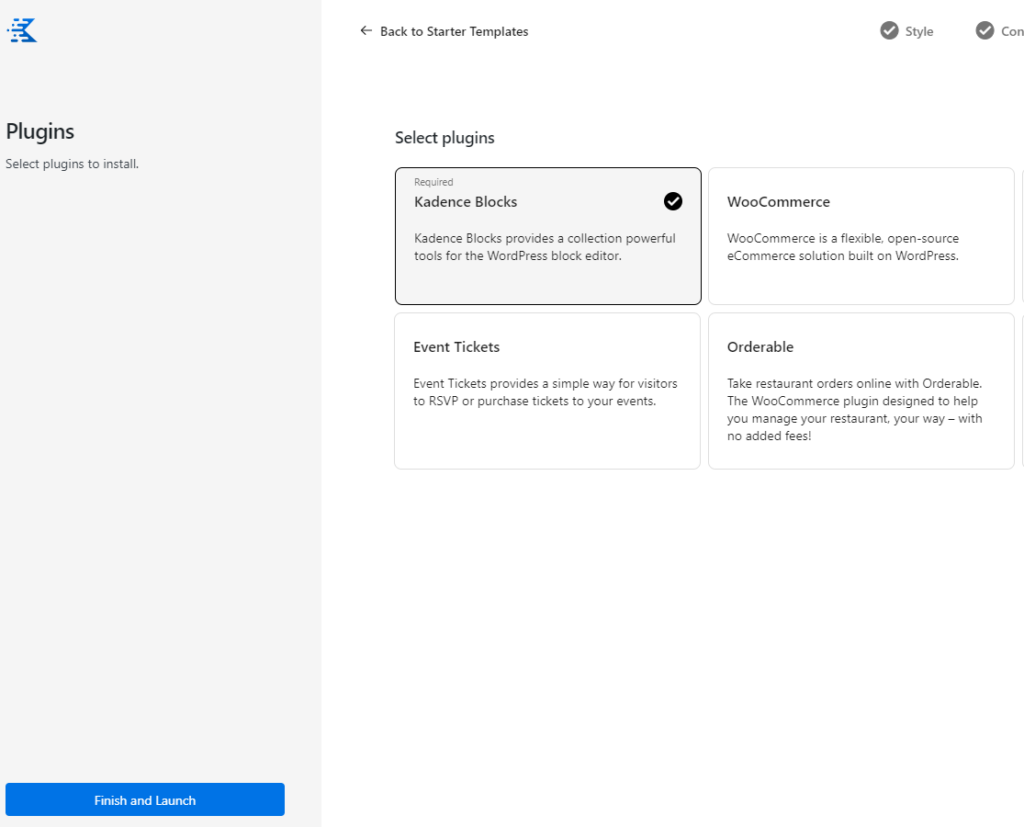
- The next screen offers the opportunith to install more plugins.
- The only one that we need is the “Kadence Blocks” and that one is already selected.
- With our selection completed, we are ready to import the page
- Click the “Finish and Launch” button to start the import.
- The website is now imported and we can start customzing it.
- Click on the view website to see how it looks on the front end.
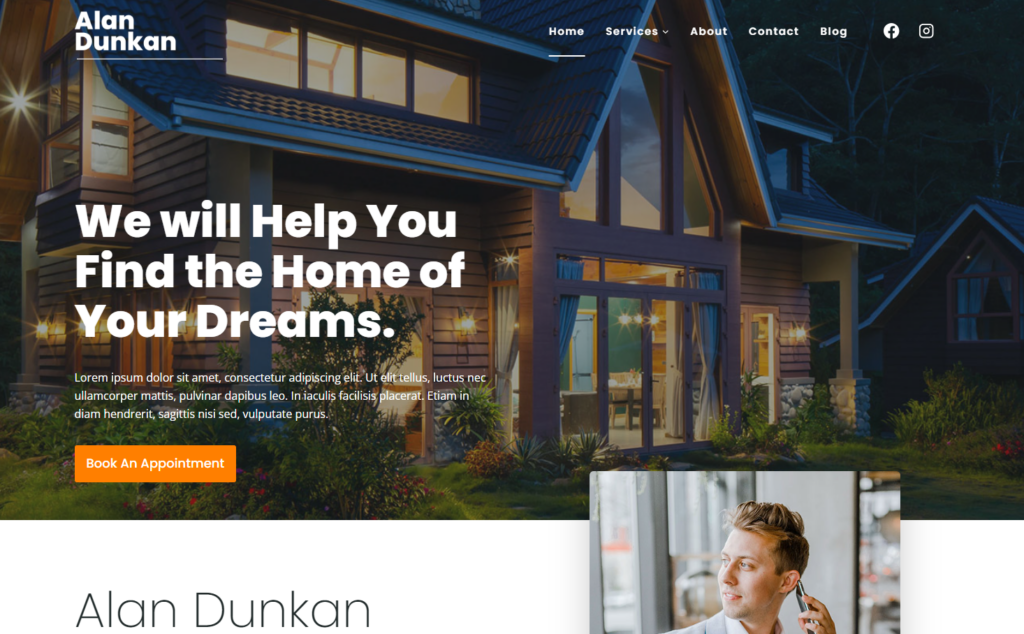
Looking good!
Progress check:
Change the Site TitleChange the Site TaglineUncheck “Discourage search engines from indexing this site”Install a WordPress theme KadenceInstall Kadence Starter TemplatesImport the template we will work from- Edit the Home Page
- Customize the Header (add your business logo and remove the Menu)
- Customize the Footer (update your contact information and social links)
- Convert the Home Page to a static version and export it
- Publish your website
We are half-way there!
Edit the Home page
To start editing the page, click on the “Edit Page” link at the top of the page, below you browser address bar. This will bring you into the page edit mode.

A brief introduction to WordPress page editing using Kadence Blocks
You have now entered the page edit mode where you’ll get a layout similar to the one below:
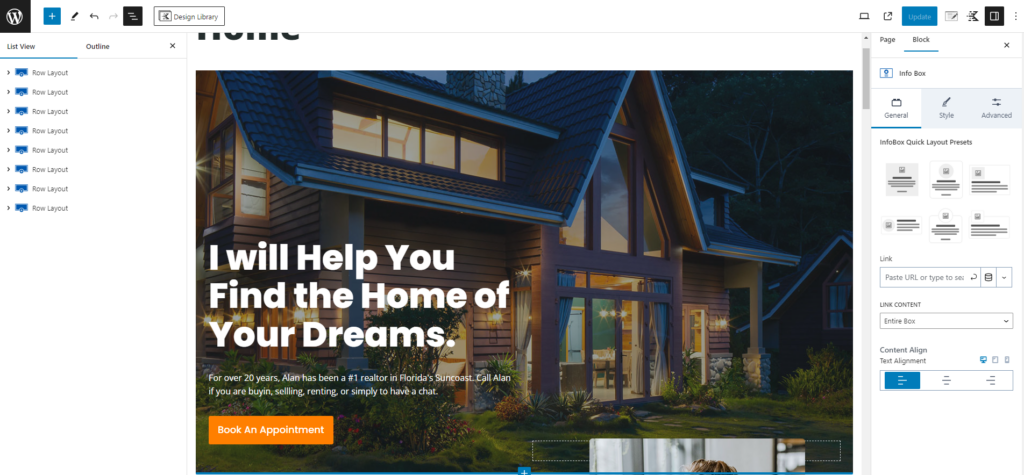
There are three panels on this screen:
- Left Panel – is the “Navigation” or “Document Overview” panel. This is were you can get the bird’s eye view of different section on your page and quickly jump between them.
- When you click on the “Plus” sign up in the top row, this pane changes to “Inserter” – a panel for selecting the blocks you want to insert “Content Canvas”.
- Middle Panel – is your “Content Canvas” or “Document Editor”, which holds content you created with, in our case, Kadence Blocks. Think of it as Microsoft Word or Google Docs for webpage editing.
- Right Panel – is the “Settings” panel. This is where you go to edit the settings of the block currently selected in the middle panel, or the setting of the page you are editing.
And this is this is where Kadence Blocks come into play and where it excells (and beats the crap out of many other Gutenberg based page builders).
Kadence Blocks
Kadence Blocks is a WordPress page builder that extends the WordPress native Gutenberg editor with a collection of custom blocks for allowing you to create more complex and visually appealing website pages. Kadence Blocks offer an easy-to-learn drag and drop capability eliminating the need to learn how to code.
Though Kadence Blocks bring close to 30 feature rich blocks across its Free and Pro versions, we will be using only 4 of them for our exercise:
You can learn more about the numerous Kadence Blocks and the functionality they offer HERE.
Note:
This article isn’t focused on giving a tutorial for building websites with Kadence Blocks. Instead, it offers guidance on creating and hosting static websites for free. As such, I won’t delve into the detailed steps of using Kadence Blocks here. The KadenceWP team has plenty of videos on their YouTube channel covering that topic, along with detailed documentation on how to use the Kadence toolset and I recommend checking out those resources for more information.
However, now that you are in the page edit mode, to tailor this page to your specific needs, here’s a general outline of what I recommend you do:
- Review the Rows (and Sections) on this page and make a note of the ones you’d like to modify
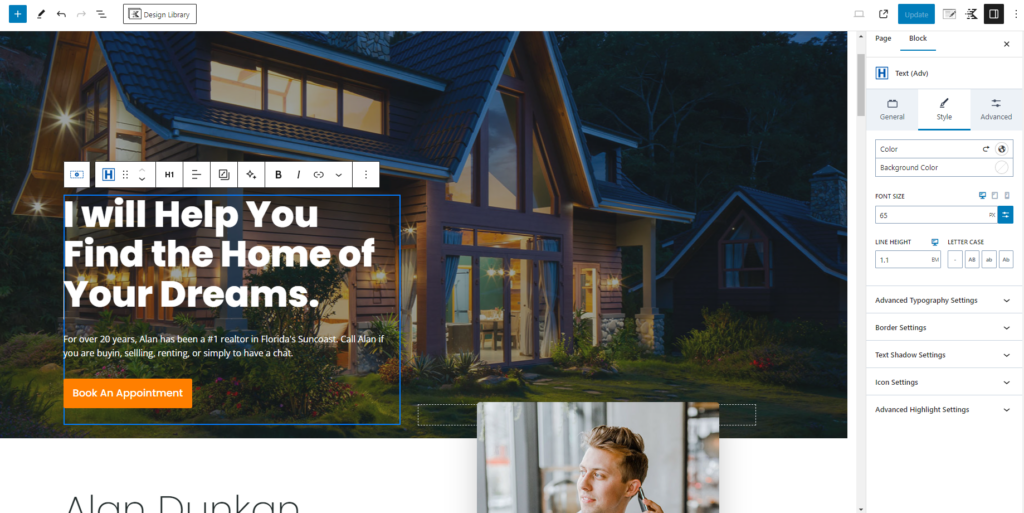
- Change the “Hero” text with your own tagline or a mission statement to make it applicable to your business.
- Change the stock picture with your own pictures. This will make the website more personable to your visitors.
- Add links to external resources, your other online properties, and so on.
- Change the “Portfolio Section” stock pictures with your own pictures. This may be the photographs of the properties you sold or are currently selling.
- Do note that a versitile and one of my favorite Kadence blocks, the “Info Box” block is being used here. Explore its properties in the right hand “Settings” panel to learn about different parameters and change them around to fit your needs

- Add your clients’ testimonials, and if you have their pictures, replace the stock pictures on the page with theirs.
- You will probably want to remove some of the elements or complete sections from the page, and feel free to do so. The very last Row with logos may be one of those sections you may want to remove.
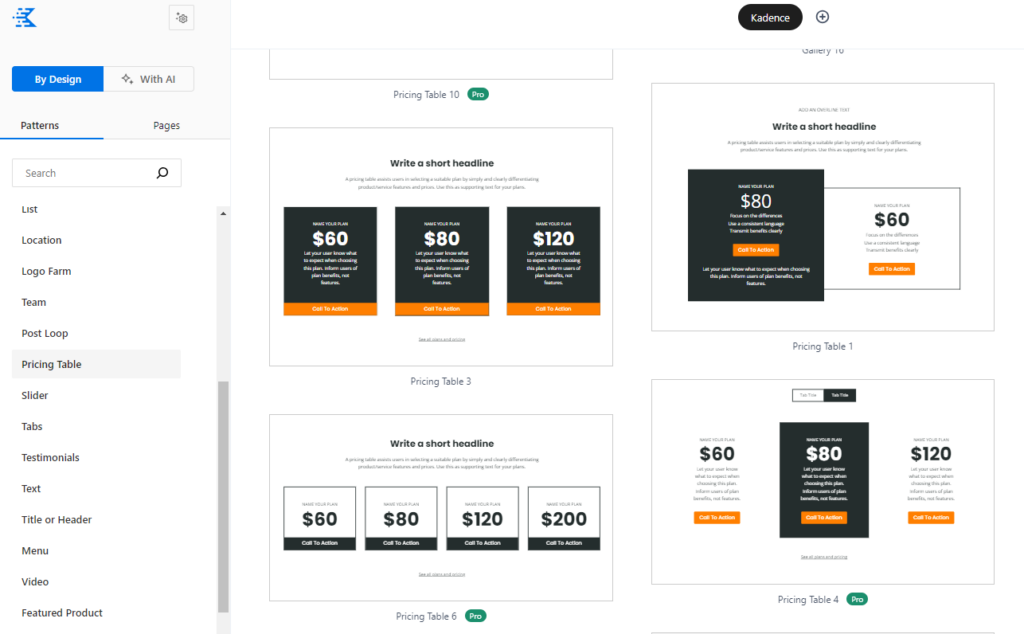
Here is another trick:
You can also add section from Kadence’s pre-configured patterns library. To do so, click on the “Design Library” button, insert the patterns you require and futher customize them with your own text. For example, you may want to import a “Pricing Table” block and modify the content in it to inform your visitors about the pricing of your services.
The objective is to ensure that the webpage you are creating is both relevant and informative regarding your business. Therefore, be sure to incorporate services details, explicit calls to action and contact information so visitors can easily get in touch with you. Though speaking of contact information, we will be providing this in the Footer area of your webpage.
Once you are done with editing the page, click the “Update” button in the top right corner, preview the page, and if you are happy with the change, close it to extit the edit mode.
With that out of the way, we can move to the next step.
Customize the Header
With the Home page edited to meet your needs, we can move to the editing (and styling) of your website’s global elements, specifically the header and footer. These elements serve as the architectural backbone of your website, providing both aesthetic appeal and functional significance.
To edit the Header, click on the “Customize” option at the top of the page,just underneath your browser’s address bar. This will bring you into the Kadence Theme customizer screen.

WordPress Theme Customizer
The WordPress Customizer is a built-in feature of WordPress Classic themes that allows you to customize various aspects of your website without the need for you to learn coding. With the use of customizer, you can easily and, in real-time, make changes to the color palette, fonts,, content sizing, the header and the footer, and change the overall aesthetics of your website.

There are a few elements that I suggest you change within the header:
- replace the placeholder logo with your own logo
- optionally, you can enable and display your tagline

- since we are creating a single-page website, remove the Menu element
- and add or remove social media icons to match your social life

Once you are done with applying your change, hit the “Publish” button to save them and exit the Customizer. You’ve now got a much cleaner header.

Customize the Footer
Now, let’s turn our attention to the footer. While the header welcomes visitors to your website, the footer bids them farewell serving as a repository for essential information such as contact details, social media links, and legal pages. Additionally, the footer can house supplementary navigation links, such as a shortened version of your “About” information, icons of awards and certifications, helping your visitors explore additional content or learn more about you.
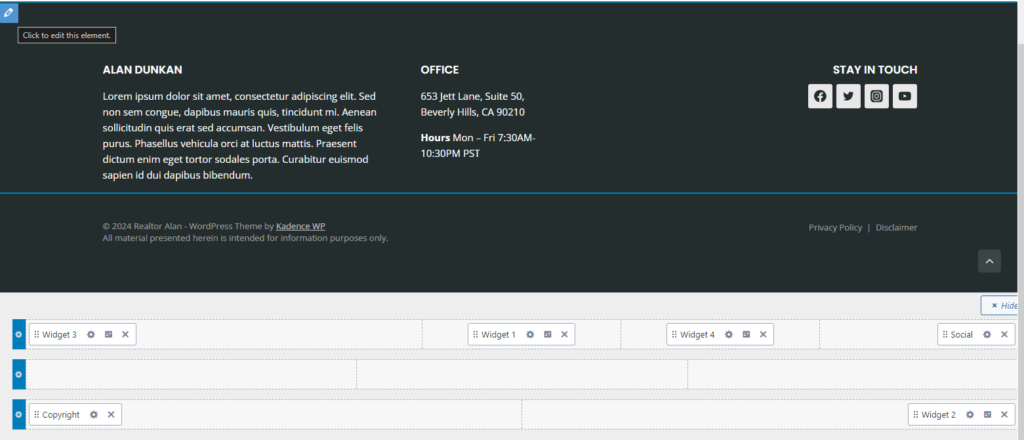
Here I suggest you keep the widgets placements as they are but change the information within.
Top footer area:
- Widget 1 – click on it to change the About info and make it relevant to yourself
- Widget 2 – edit the Address and Business Hours info to make it reflect your business location and working hours
- Widget 3 – leave it as is
- Widget 4 – this is where you go to change your Social Media links. When you click on this Widget you will be presented with the narow screens below – hold on for now
- Widget
Bottom footer area:
- Make the changes to the Copyright and Disclaimer (Widget 2) areas. If you do not need this information, youd could simply remove the widgets.
Kadence presents you with a very accessible way to change your Social Media links from a single place. To do that, click on the Social widget in the Top Footer area and you will be presented with the screen below:
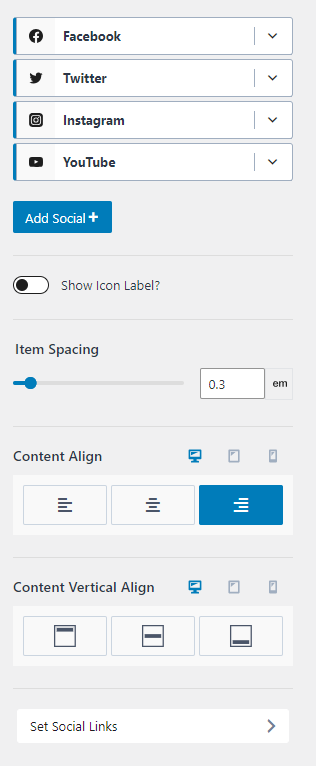
To change the Social Media links, click on Set Social Links toward the buttom of this screen and you will be taken to the Customizer area below where you could set your social links.
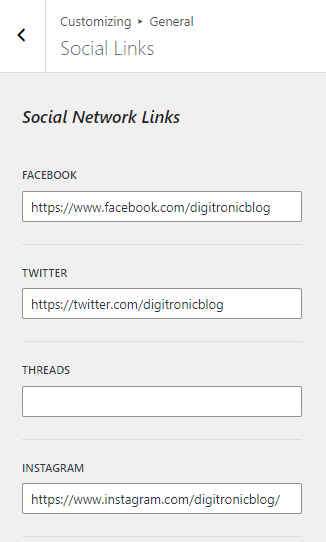
The Social widget in your Top Footer area will now inherit the social media links information from this global setting. And if you place this widget anywhere else in your website, the widget will automatically display your social links.
When you are done with applying the changes hit the PUBLISH button at the top of Customizer’s left side panel to be taken back to your website.
This is it!
Change the Site TitleChange the Site TaglineUncheck “Discourage search engines from indexing this site”Install a WordPress theme KadenceInstall Kadence Starter TemplatesImport the template we will work fromEdit the Home PageCustomize the Header (add your business logo and remove the Menu)Customize the Footer (update your contact information and social links)- Convert the Home Page to a static version and export it
- Publish your website
We are now ready to proceed with the finishing tasks: turning our website to a static version, exporting it and uploading to our host to make it accessible to your visitors.
Step 5: Export your website
To export the website, we will be using a Simply Static plugin.
Simply Static is a WordPress static site generator plugin that allows you convert your WordPress website from a dynamic to a static version. Simply Static comes in two version, the FREE Community Edition and the Simply Static PRO version with the difference between the two outlined below:
Simply Static FREE
Simply Static PRO
As shown in the comparision table above the Simply Static FREE version imposes the limitation that are not present in the PRO version of the plugin. To put the things into perspective; everyone loves website forms. They allow you to collect visitor data, deposit that data into your Customer Relationship Management (CRM) system and segment the data into groups to better understand your customers’ unique needs so you can market to them more successfully.
With the Free Community Edition of Simply Static, you will not be able to collect your website visitors’ information via an embeded forms. Simply Static PRO would enable i.e. Fluent Forms integration, so that your visitors could submit their info, and Simply Static would pass this collected information to your email or your CRM system.
With the difference between the two now understoo, Let’s get to work.
In the next step, we will be creating a ZIP file that contains the static files from our single-page WordPress website. We’ll be using the free version of Simply Static for now.
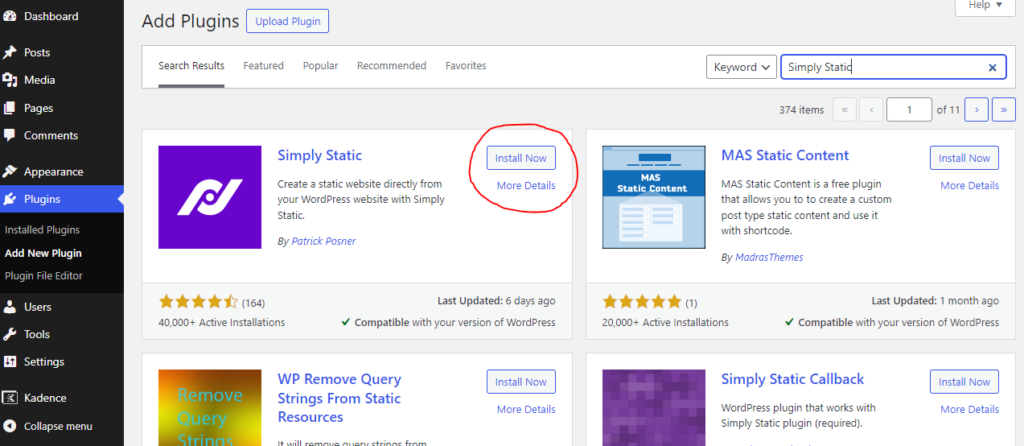
In your WordPress Navigation sidebar on th eleft hand side, go to Plugins → Add New → search for Simply Static. → Install and Activate the plugin.
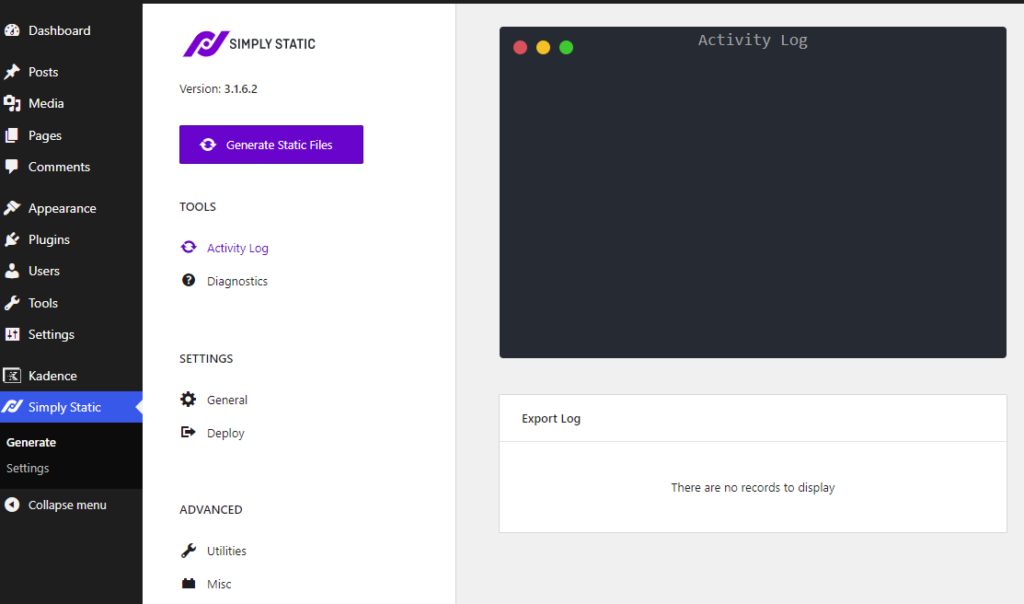
Navigate to Simply Static → click Generate Static Files button to convert your WordPress website to a static version.
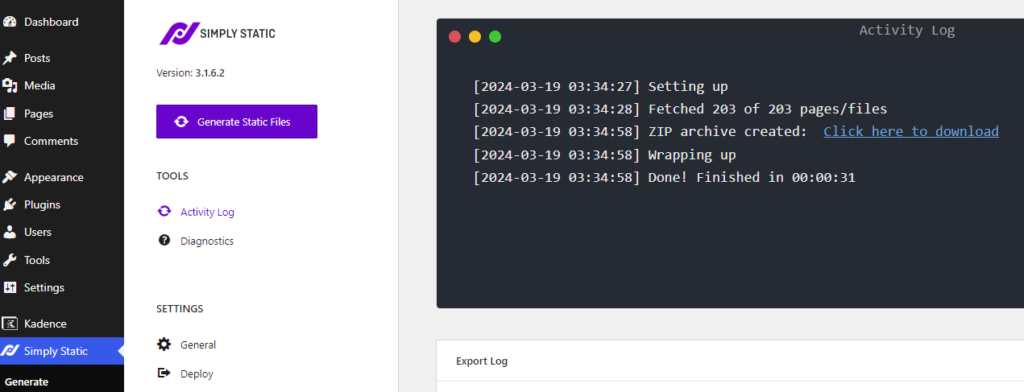
Depending on the size of your website, this could a couple of minutes. Since we’ve created a single-page website with a minimum design, this operation should run fairly quickly. Once finished, you can download the ZIP file containg your static website from the link provided to you.
All that is left now is to publish you static website to the website hosting platform – here we come Netlify!
Step 6: Publish your website
In this step, we are looking for a place to host our upcoming website. To be precise, we’re in search of a free static website hosting provider that supports custom domains. For that, we wil turn to Netlify, known as the top-notch hosting platform. Although there are countless shared hosting providers out there, that offer cheap website hosting (mostly for a year only to increase the price dramatically upon renewal) we’re skipping those for now. The beauty is the there are several high quality platforms available that let you host a static website for free. Yes, for FREE! You can read more about them in this blog post – The best 5 platforms to host a static website for free.
As mentioned, Netlify is the king, hence, we will be hosting our static website on Netlify, due to Netlify’s generous free plan and excellent service. Let’s navigate to the Netlify website and create your free account. Netlify is available at https://www.netlify.com/
Upon registering Netlify account you will land in the “Team Overview” area.
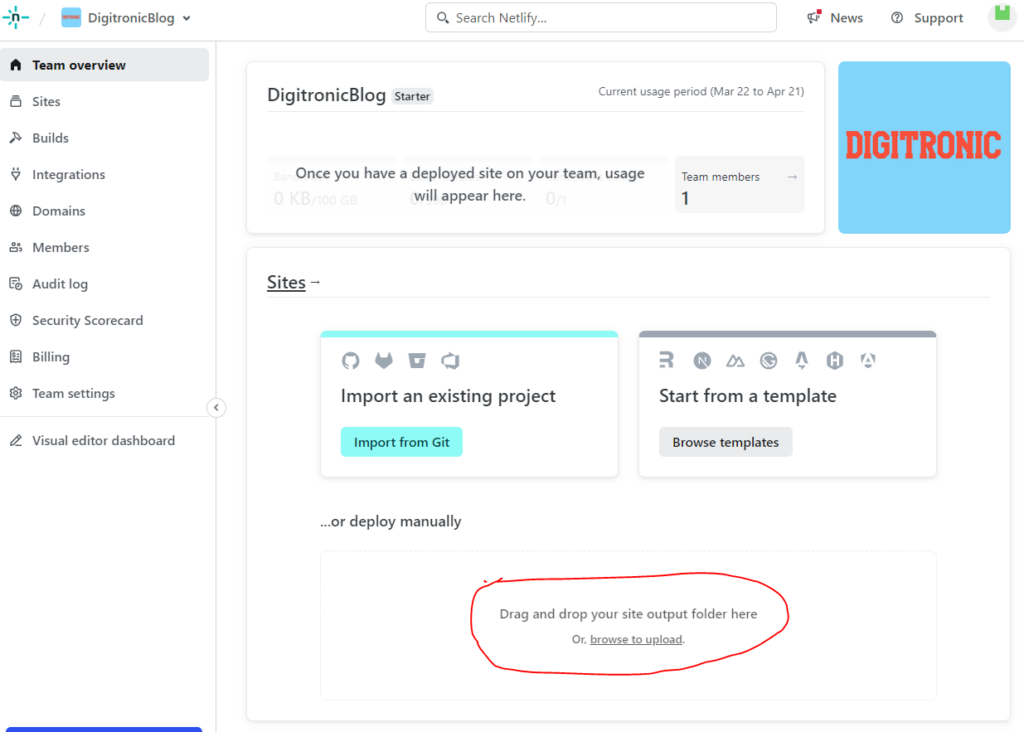
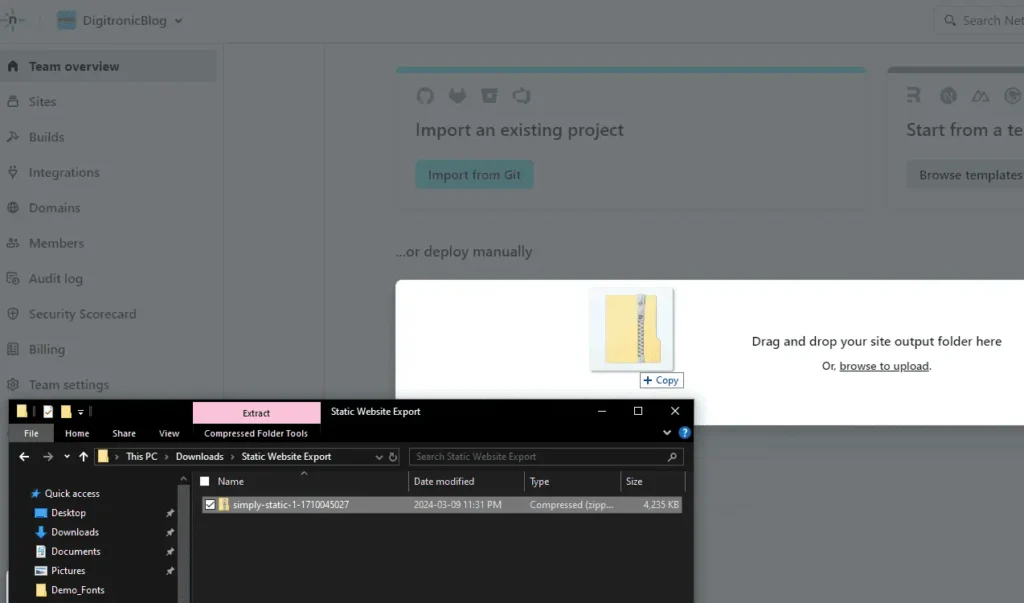
All that you need here to upload your website to Netlify is to take Simply Static exported version of your website, the ZIP file, and drag and drop it into Netlify’s SITES area.
Congratulation! You website is now live and accessible on Netlify’s subdomain that will looks similar to this:
https://moonlit-cactus-f1893e.netlify.app/

Connect a custom domain
Let’s admit, the sub-domain name provided by Netlify is not that user friendly, it does not reflect your business, or the purpose of the website you are creating and we will need to change it. Luckily, we can change it easily.
As Netlify informs you, there are three steps to making your website live and you just complete the first one – you deployed your website. Next, you will need to connect your custom domain and as a last step, secure your website with Let’s Encrypt certificate..
As you have already updated the name servers in your domain registar Ionos in the 1st step, you can skip over this screen. If you have not done, log into Ionos or whatever domain registar you are using, and update the name servers with the names below: dns1.p07.nsone.net / dns2.p07.nsone.net / dns3.p07.nsone.net / dns4.p07.nsone.net.
Navigate to Sites → Domain Management to add your domain.
If you’d like, you also have an option to change your site name from the Netlify generated name to something more meaningful to you. To change the name, click on Options → Edit site name.
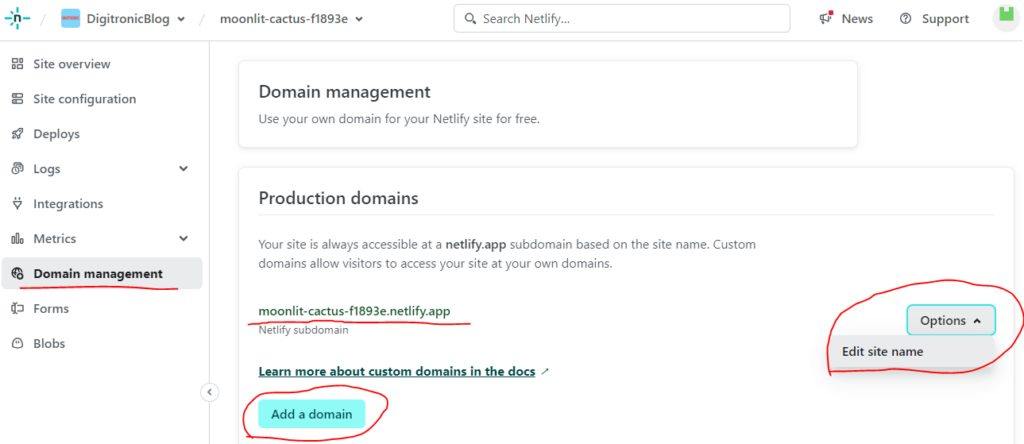
To add your custom domain, click on the blue Add a domain button → input your domain name → click Verify.
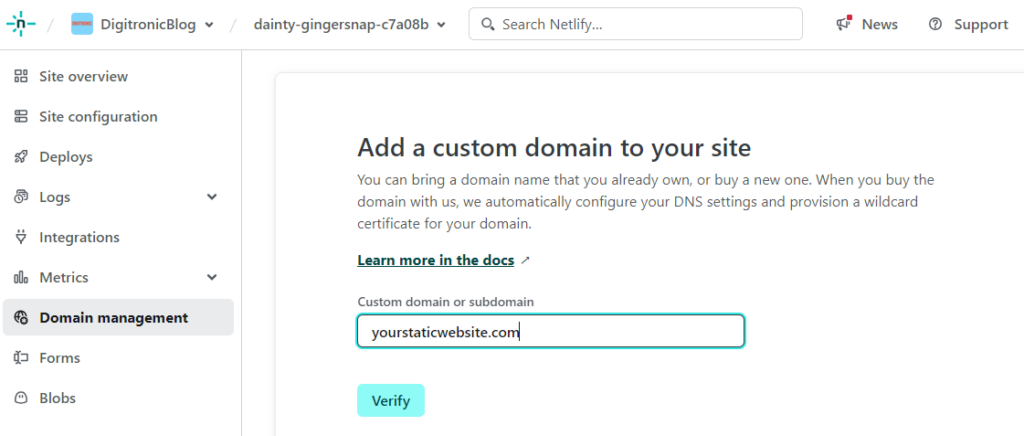
Netlify will give you a warning that you domain name is already registered. If you registered this domain name through a different registrar, select Add domain to add it to your site. You can configure Netlify DNS for this domain later.
Click the bluish Add Domain button to complete the change.
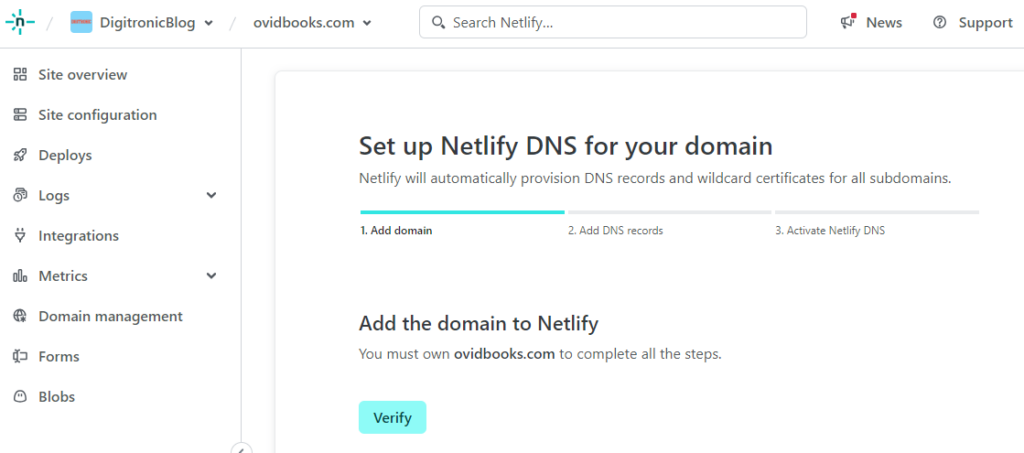
You will be taken to Production Domains section. On this screen, click on Options button next to your domain name and select “Set up Netlify DNS” → Click the bluish Verify button here → the screen will go through a quick change and you will be presented with the Add Domain button → Verify buton→ Done button.
Secure your website with Let’s Encrypt certificate
Netlify will provision your Let’s Encrypt certificate automatically once the DNS configuration for your custom domain is pointing to Netlify servers and the changes have propagated. There are few steps that you will need to go through:
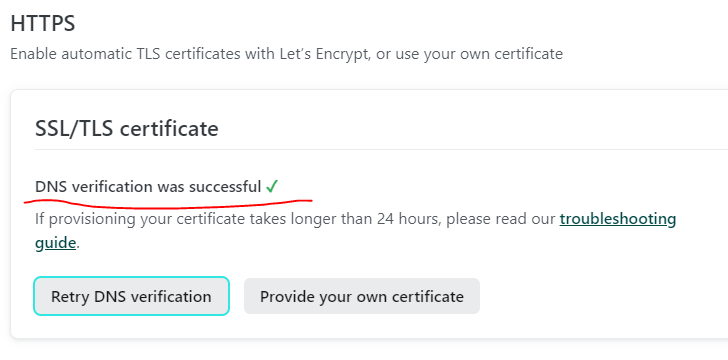
→ navigate to HTTPS section and click “Verify DNS configuration” button
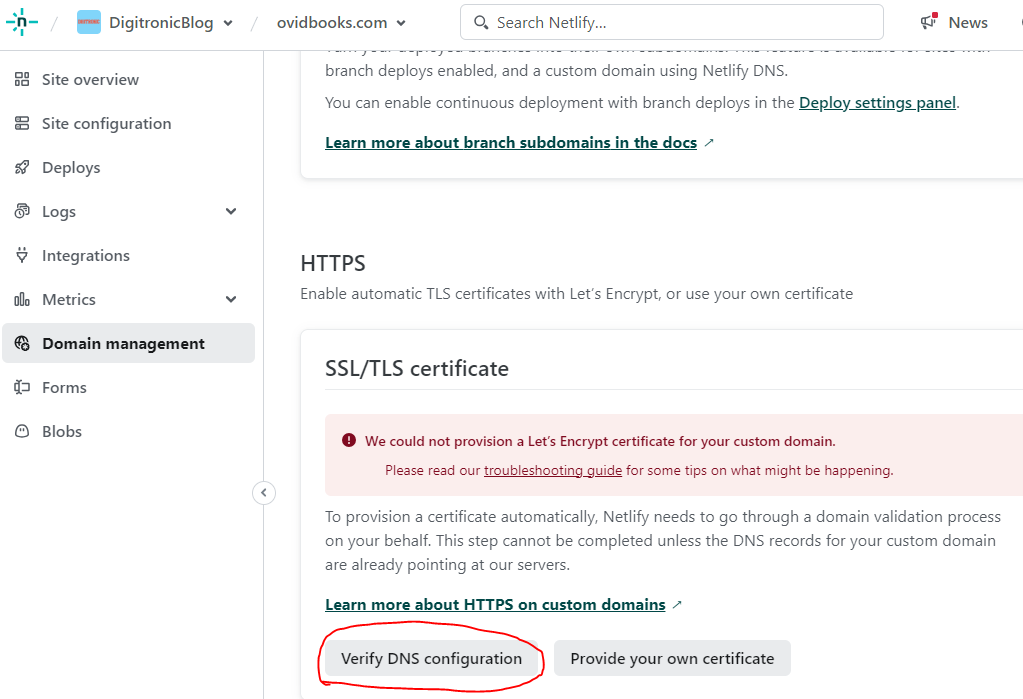
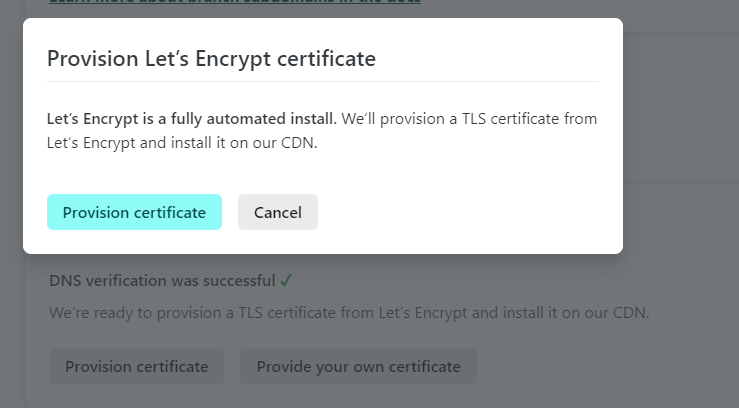
→ Click “Provision certificate” button
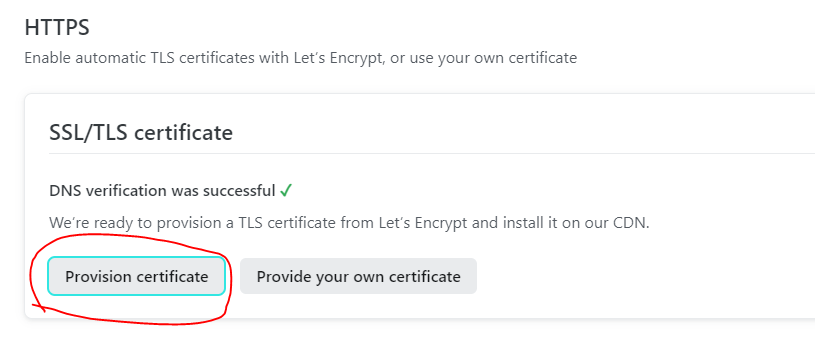
→ Upon successful provisioning, you will receive a message “DNS verification was successful”.
For a video overview of the above process, you can view James Q Quick’s 5 minutes walkthrough on YouTube:
CONGRATULATION!
Your website with your own custom domain is now live and ready to receive visitors!
Step 7: Make a backup of your website
Before you go on to take a well deserved drink, let’s do a bit of housekeeping.
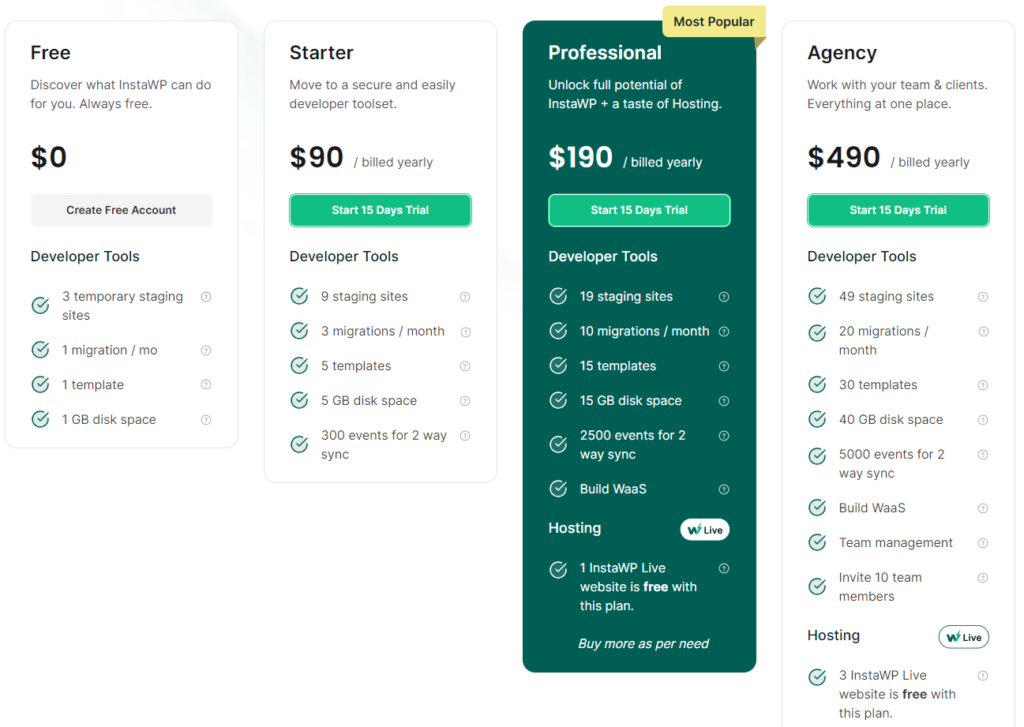
Temporary websites set up on InstaWp expire after 7 days and become inaccessible, and this is applicable to the website you just created. To access your InstaWP website instance after 7 days, you would need to sign up for one of InstaWP plans. The pricing starts from $90/year for Starter plan, which allows you to create and keep up to 9 staging sites.
The question you may be asking is: why do I need a backup when my static website is already up? For a few reasons:
- To accelerate future updates: Yes, the website can be static, but no business is a static businees. As such, you may need to update your website at some future point with new information, and to do that, you would want to start from your original website copy, as opposed ot starting from scratch. A copy of your website will give you a head start.
- To have a webiste blueprint – You may want to build additional static websites (i.e. for next years conference, or the next property you will be selling), and starting from a pre-made template will be a real time saver. Plus, it will help with the visual consistency of your landing page.
- To change a hosting provider – your hosting provider gives you the services for free. Thank them veryh much by giving them a review. This hosting provider may change the terms of its “Free usage policy” forcing you to look for alternative providers. Publishing your site to another host would be as simple as uploading it to a folder on your new hosting platform.
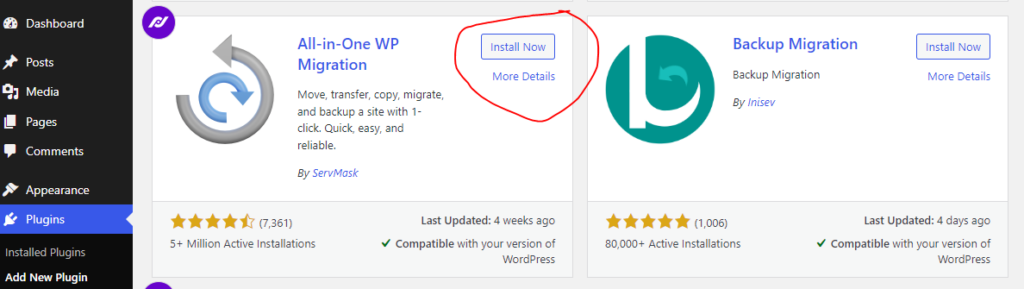
To make a backup of the website we will be using All-in-on WP Migration plugin.
Go back to your WordPress Admin area → Plugins – Add New Pluging → search for “All-in-One-Migration”. Once you located it, click on Install Now – Activate.
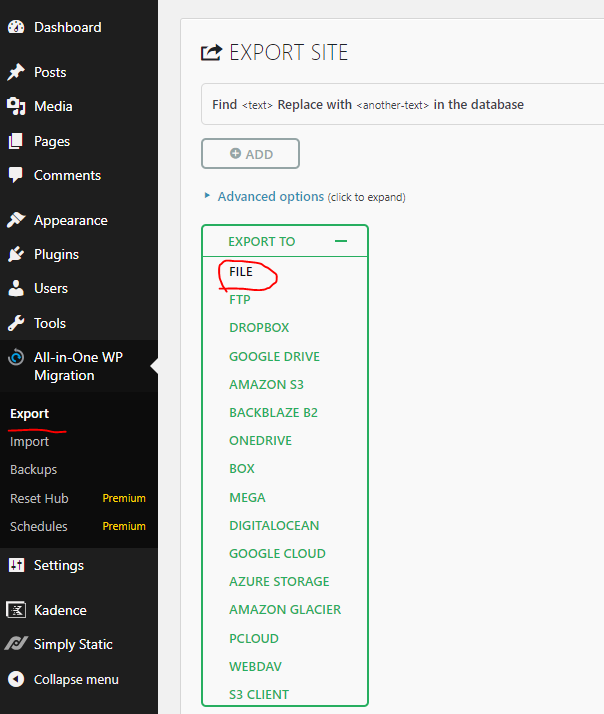
Navigate to All-in-One-Migration → Export → Export To – select FILE for your export destination.
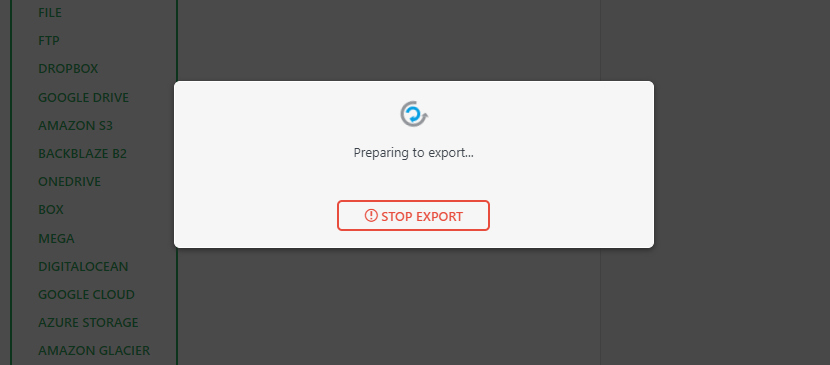
All-in-One-Migration will prepare your files for export to a local drive.
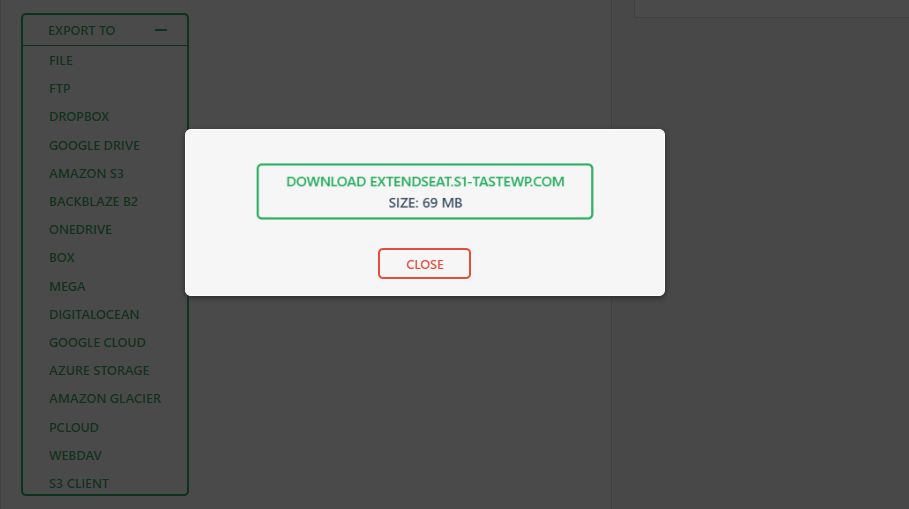
Once the file is ready, download it to your local drive and save it for future use.
Maintain and update your free static website
As this is a static website, no maintenance will be required. Make sure to periodically check that the website is working and is accessible. If you’d like to make any changes to the website, you would need to pull out the copy of your backup and these steps:
- Install the WordPress instance on InstaWP
- Upload your backup made with All-in-one WP Migration
- Customize the website
- Export the Static version
- Upload the static version to your hosting provider
This is it!
Final thoughts
Creating a free static website for your small business is easy and cost effective. For many local small businesses, dynamic websites require too much effort, and going with the static website could be the right decision for them. Ultimately, local businesses only need to serve an appealing website to their locality with the information about the services they offer and how to get in contact with them. The high performance and quick indexability of static websites make it an ideal choice for them.
Still, we do not recommend that you rely solely on the static website for your online presence, and that instead you invest into a good dynamic website that will bring more value to your visitors and ultimately to your business.
Notes about free tools
Although for this article we have used only the free tools to show you how to create a static website for free, or rather the free version thereof, I strongly suggest investing into PRO version of the aforementioned tools. There are multiple reasons for this with some of them listed here:
- By investing in the PRO versions you support the developers’ work, thus ensuring the longevity of the product you are using
- The PRO version offers additional capabilities, encouraging greater creativity. i.e. the Pro version of Simply Static will enable you to add forms to your website and to publish your website to Netlify directly from WordPress interface
- PRO licenses provide access to professional support.
- Remember, the developers behind these tools also have families to feed too
Credits:
Following products and/or services where referenced to and/or used while writing this article: